Insulating your garage door offers significant benefits for comfort and energy savings. An uninsulated garage door allows heat to escape in winter and enter during summer. This guide provides clear instructions for insulating your garage door effectively while staying within budget.
Why Insulate Your Garage Door
Garage door insulation reduces energy costs by creating a thermal barrier. If your garage shares a wall with your home, an insulated door helps maintain indoor temperatures. Additionally, insulation reduces noise from outside traffic and weather.
Temperature control matters especially if you use your garage as a workshop or storage area. Extreme temperatures can damage stored items and make the space uncomfortable. According to Consumer Reports, proper insulation can reduce heating and cooling costs by up to 20 percent.
Insulated garage doors also feel more solid and operate more quietly. The added material dampens vibrations and reduces rattling sounds. Therefore, insulation improves both function and comfort.
Understanding R-Value and Insulation Types
R-value measures insulation effectiveness. Higher R-values indicate better insulating performance. Garage door insulation typically ranges from R-8 to R-16.
Two main insulation types work well for garage doors. Polystyrene foam boards are rigid panels that fit between door sections. They offer decent insulation at a lower cost. Polyurethane foam provides superior insulation with higher R-values but costs more.
Reflective insulation uses foil-backed material to reflect heat. This option works best in hot climates where cooling matters most. However, it provides less insulation value in cold weather compared to foam options.
Choose your insulation type based on climate and budget. Cold climates benefit most from polyurethane foam. Meanwhile, moderate climates often find polystyrene adequate for their needs.
Tools and Materials You Will Need
Gather all supplies before starting your project. This preparation prevents delays and keeps your work flowing smoothly.
Essential materials include insulation kit or foam boards, adhesive or double-sided tape, utility knife, measuring tape, straightedge or T-square, work gloves, and safety glasses. You may also need a step ladder for reaching upper panels.
Many home improvement stores sell garage door insulation kits. These kits include pre-cut panels and necessary adhesive. Consequently, kits simplify the process for first-time installers.
Check your garage door manual for weight limits. Adding insulation increases door weight. Therefore, your opener must handle the additional load safely.
Measuring Your Garage Door Panels
Accurate measurements ensure proper insulation fit. Start by counting the number of panels on your garage door. Most doors have four to six horizontal panels.
Measure the width and height of each panel section. Measure from the inside edges where the insulation will attach. Write down each measurement carefully since panels sometimes vary slightly in size.
Note any obstructions like hinges, struts, or braces. You will need to cut around these features. Additionally, identify the panel material. Steel doors accept adhesive easily, while aluminum may require different attachment methods.
Take photos of your door panels for reference. These images help when cutting insulation pieces later. Furthermore, photos document any unique features you need to accommodate.
Preparing the Garage Door Surface
Clean all door panels thoroughly before installation. Use a degreaser or household cleaner to remove dirt, oil, and grime. Dirty surfaces prevent adhesive from bonding properly.
Rinse panels with clean water and dry them completely. Any moisture interferes with adhesive performance. Therefore, allow several hours for drying if needed.
Inspect panels for damage or rust. Repair any issues before adding insulation. Small rust spots can be sanded and treated with rust converter. Larger damage might require professional evaluation.
Check door operation before insulating. Open and close the door several times. Listen for unusual sounds or binding. Address mechanical issues first since insulation adds weight and stress to the system.
Cutting Insulation to Size
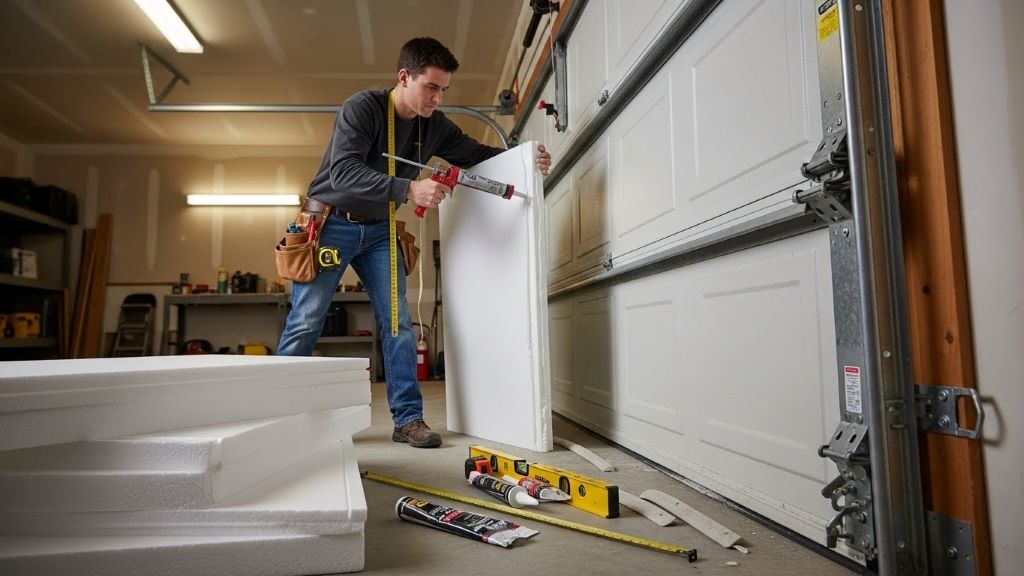
Lay your insulation material on a clean, flat surface. Use your measurements to mark cutting lines with a pencil or marker. A straightedge ensures clean, accurate cuts.
Cut polystyrene boards with a utility knife. Score the surface deeply, then snap the board along the line. For thicker materials, make multiple passes with the knife. Sharp blades produce cleaner cuts and safer operation.
Cut pieces slightly smaller than your measurements. This allows easier installation and accounts for measurement variations. A quarter-inch gap around edges works well for most installations.
Label each cut piece with its panel location. This organization saves time during installation. Additionally, numbering prevents confusion if you need to pause the project.
Installing Insulation on Door Panels
Start with the bottom panel and work upward. This sequence makes installation easier and more efficient. Apply adhesive or double-sided tape according to manufacturer instructions.
For adhesive application, apply lines or dots across the panel back. Follow the pattern recommended on the product label. Too much adhesive creates mess, while too little reduces bonding strength.
Press the insulation firmly against the door panel. Start at one edge and work across to prevent air bubbles. Apply steady pressure for 30 seconds to ensure good contact.
Trim around hinges, brackets, and other hardware as needed. Use your utility knife to make precise cuts. Work carefully to avoid damaging door components or cutting yourself.
Continue this process for each panel. Take breaks if needed since repetitive motions can cause fatigue. However, try to complete the project in one session for consistent results.
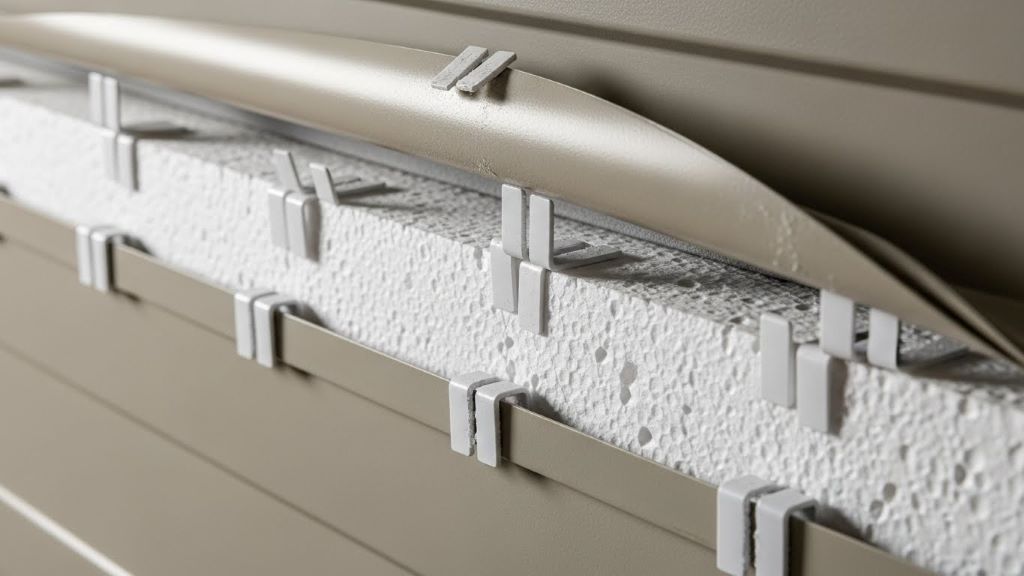
Securing Insulation with Retaining Clips
Some installations benefit from retaining clips for extra security. These plastic clips snap over the insulation edges and prevent sagging over time.
Position clips evenly across each panel. Most panels need four to six clips depending on size. Space them equally for balanced support.
Push clips firmly into place until they snap. The clips should grip both the insulation and door panel securely. Test each clip by gently tugging to confirm attachment.
Retaining clips work especially well on larger panels or in areas with temperature extremes. The clips maintain insulation position as materials expand and contract. Therefore, they provide long-term reliability.
Sealing Gaps and Edges
Address any gaps between insulation pieces or around panel edges. Small gaps reduce insulation effectiveness significantly. Use expanding foam sealant designed for gaps and cracks.
Apply sealant sparingly since it expands as it cures. Fill gaps about halfway, then allow the foam to expand fully. Excess foam can be trimmed after curing with a utility knife.
Check the weatherstripping along door edges. Replace worn or damaged strips to maximize insulation benefits. Fresh weatherstripping creates better seals against drafts.
Pay special attention to the bottom door seal. This area experiences the most wear and allows significant air infiltration. According to This Old House, proper door sealing can reduce energy loss by up to 35 percent.
Testing Door Balance After Installation
Insulation adds weight that affects door balance. Test your door balance after completing installation. Disconnect the opener by pulling the emergency release handle.
Manually lift the door halfway and release it. A properly balanced door stays in place or moves slowly. If the door drops quickly, the springs need adjustment.
Never adjust garage door springs yourself. These components store tremendous energy and can cause serious injury. Therefore, contact a professional garage door technician for spring adjustments.
Reconnect the opener and test automatic operation. Listen for unusual sounds or straining motors. The opener should raise and lower the door smoothly without hesitation.
Adjusting Opener Settings if Needed
Your garage door opener may require adjustment after adding insulation. The added weight changes the force needed to operate the door properly.
Locate the force adjustment controls on your opener unit. These controls typically have up and down or open and close settings. Consult your opener manual for specific adjustment instructions.
Increase the force settings gradually in small increments. Test door operation after each adjustment. The door should close completely without reversing unexpectedly.
Check the auto-reverse safety feature. Place a board or roll of paper towels under the closing door. The door should reverse immediately upon contact. This safety feature protects people and pets from injury.
Maintaining Your Insulated Garage Door
Regular maintenance keeps your insulated door functioning properly. Inspect insulation every few months for loose sections or damage. Reattach any pieces that have separated from the door.
Clean door panels periodically with mild soap and water. Avoid harsh chemicals that might damage insulation materials. Gentle cleaning preserves both appearance and function.
Lubricate all moving parts including hinges, rollers, and tracks. Use garage door lubricant rather than general-purpose oils. Proper lubrication reduces wear and keeps operation smooth.
Check weatherstripping annually and replace as needed. Damaged seals undermine insulation benefits. Additionally, inspect for any new gaps that might have developed over time.
Additional Insulation Considerations
Consider insulating your garage walls and ceiling for maximum benefit. Door insulation works best as part of a comprehensive approach. Wall insulation complements door upgrades significantly.
Evaluate your garage door itself if it is very old. Sometimes replacing an old door with a pre-insulated model makes more sense. New insulated doors offer superior R-values and include modern safety features.
Think about ventilation needs when insulating. Garages need some air circulation to prevent moisture buildup. Ensure adequate ventilation even with improved insulation.
Window panels in garage doors require special attention. Apply window insulation film or use insulated curtains for these areas. Otherwise, windows become thermal weak points.
Cost Considerations and Return on Investment
DIY garage door insulation costs between 50 and 200 dollars depending on door size and materials chosen. This investment pays back through reduced energy bills over time.
Professional installation adds labor costs but ensures proper technique. Quotes typically range from 200 to 500 dollars for complete installation. However, DIY installation saves money if you follow instructions carefully.
Energy savings vary based on climate, garage use, and home configuration. Most homeowners notice immediate comfort improvements. Furthermore, the project often recoups costs within two to three years through lower utility bills.
Conclusion
Insulating your garage door is a practical weekend project that delivers lasting benefits. By following these steps, you can improve energy efficiency, reduce noise, and create a more comfortable garage space. The process requires basic tools, careful measurement, and attention to detail. Whether you choose polystyrene or polyurethane foam, proper installation maximizes insulation performance. Remember to test door balance after installation and adjust your opener settings if necessary. With regular maintenance, your insulated garage door will provide years of improved comfort and energy savings.
Frequently Asked Questions
How much does it cost to insulate a garage door yourself?
DIY garage door insulation typically costs between 50 and 200 dollars. The price depends on your door size, insulation type chosen, and whether you purchase a kit or individual materials. Kits often cost more but include everything needed for installation.
Will insulating my garage door make a noticeable difference?
Yes, insulating your garage door makes a noticeable difference in temperature control and noise reduction. You will feel warmer in winter and cooler in summer. Additionally, insulation dampens outside noise and reduces door operation sounds significantly.
Can I insulate my garage door if it has windows?
Yes, you can insulate a garage door with windows. Insulate the solid panels normally, then address windows separately with insulation film or thermal curtains. Some manufacturers offer insulated window panel replacements for garage doors.
Do I need to adjust my garage door opener after adding insulation?
You may need to adjust your opener settings after insulation. The added weight requires more force to lift the door. Check your opener manual for force adjustment instructions. Additionally, verify that safety features still function properly.
What R-value should I choose for garage door insulation?
Choose R-8 to R-12 for moderate climates and R-13 to R-16 for cold climates. Higher R-values provide better insulation but cost more. Consider your climate, budget, and how you use your garage when selecting insulation.
Related Topics:

Average Rating